
Jun 13, 2026
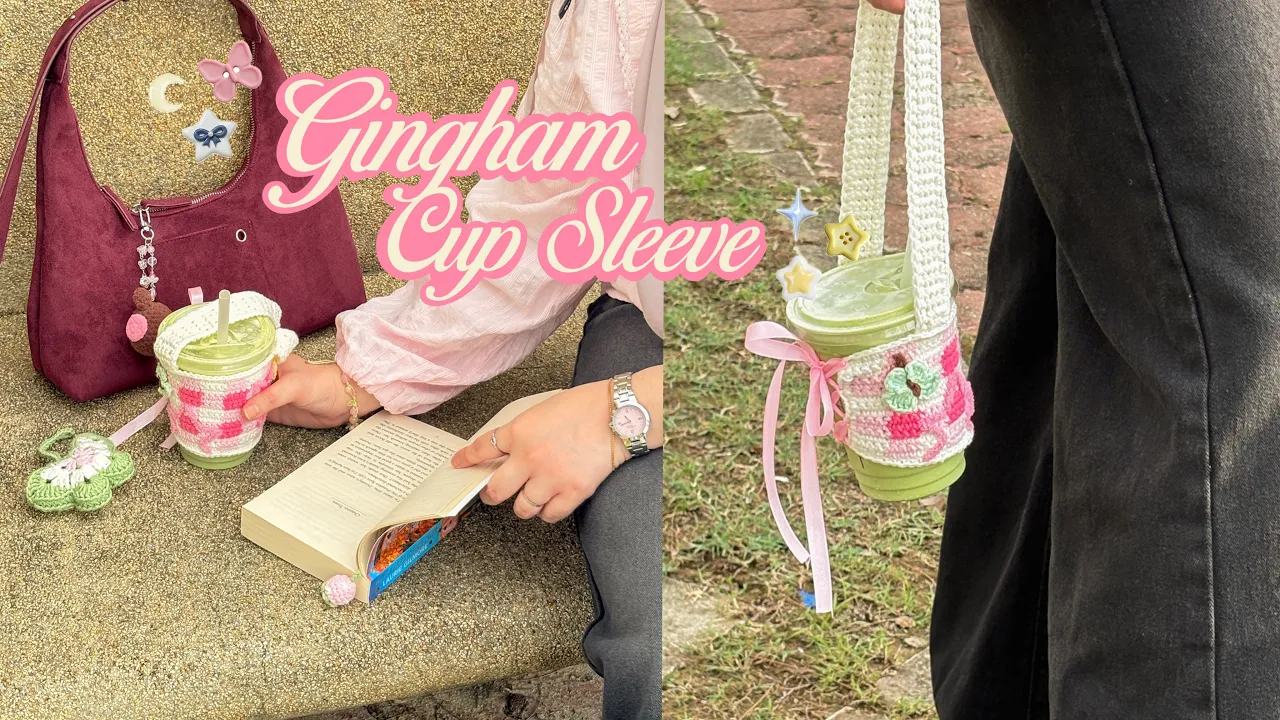
2 in 1 crochet butterfly keychain transformable cup holder (no sew)


If you’re looking for that perfect item for your next craft market, you just found it. Today on the blog, I’m sharing the pattern for my 2-in-1 Butterfly Charm. It pretty on your bag, making it the perfect aesthetic bag accessory until you buy a drink. With a quick flip, it transforms into a functional cup sleeve! It’s the ultimate magic trick crochet project that customers (and friends) absolutely love! Have fun and happy crocheting!
✿ Copyright
Please do not copy or redistribute this pattern as your own. This 2-in-1 butterfly keychain transformable cup holder crochet pattern belongs to me, @mucie.studio. You may sell the finished items made using this pattern! Just please give me credit to help support me and my art. This will help me create more patterns for you in the future!
Watch the video below and crochet along with me! I recommend you watch the video while keeping the pattern open to make your crocheting process easier! <3
✿ Notes
‣ This pattern uses US terminology.
‣ Weave in any excess yarn.
‣ This pattern is a standard size which suppose to hold regular cup size. However, to get the same size make sure to use the same yarn size and hook size as this pattern.
‣ From round 2 until the end the stitches that has bracket (xx,xx,xx) means you will insert all of it into the same space before moving on to the next ch space.
✿ Materials
5-ply yarn in 3 colors.
From round 1-3 you will use different color for each round. The yarn color you use on round 3 will be the main color for the net pattern that hold your cup.
4.0mm crochet hook
Stitch marker
Scissors
Darning needle
✿ Stitches & Abbreviation
Ch: Chain
St(s): Stitches
Sc: Single crochet
Dc: Double crochet
Hdc: Half double crochet
Ttr: Triple treble crochet (yarn over 4 times and pull through 2 loops until you're left with one loop on your hook)
Sk: Skip the next stitch
Sl st: Slip stitch
✿ 2-in-1 butterfly keychain / cup sleeve crochet pattern ✿
Butterfly
★ (you need 2 pieces for the front and back piece)
Round 1: Take the first yarn color, i'm using white yarn. In a magic ring, ch 2.
Then insert the following stitches into the magic ring:
(2dc, ch2) x 2, 2dc , ch1, 2dc, ch 2, 2dc, ch2, sl st into the magic ring.
★ Ch 1 and cut your yarn. Pull the end of the yarn to tighten the ch1.
Round 2: Take the second yarn color, i'm using yellow yarn.
We're only going to work in the ch space. Attach your yarn and start in the first corner where you have the ch 2 space and continue with the following stitches:
(Ch2, 3dc, ch2, 3dc), (3dc, ch 2, 3dc), sl st in the ch 1 space of the last round, (3dc, ch2, 3dc) x 2 make the same stitches in two different ch 2 space, ch2 and sl st into the ch2 space.
★ Cut your yarn and pull through.
Round 3: Take the third yarn color, i'm using pink yarn.
On round 1, we have our ch2 and the first dc. You will start in the space in between of the ch2 and first dc. Attach your yarn in that stitch by chaining 1 and continue with the following:
(2sc in that space), 1sc, 2sc in the next space which is the ch2 space of round 2, 1sc, sk and work this in the next ch 2 space (4dc, ch2, 4dc), (1dc, 1hdc), 1sc, sl st into the space, 1sc, sk and work this in the next ch 2 space (10dc), sk the stitch that's hidden by the 10 dc and in the next st make 1sc, sk and make a sl st into the next st, sk and work this into the next stitch (1sc), sk and in the next ch 2 space insert (10dc), sk the stitch that's hidden by the 10 dc and in the next st make 1sc, sk and make a slip stitch in the next, sk and make 1sc in the next st, (1hdc, 1dc), in the ch 2 space work (4dc, ch2, 4dc), sk and work this into the next stitch (1sc), 2sc, 1sc, 3sc into the space in between of the ch 2 and 1dc in the round 1, sl st into the magic ring, 2sc into the ch 2 space where we attach the yarn, sl st into the first st.
★ Ch 1 and cut your yarn and weave in any excess yarn.
Repeat the steps and make one more butterfly.
Round 4: Face the front side of the butterflies together, basically you're going to work with the wrong side. Start in the ch 2 space and attach your yarn by making a ch 1. Then, insert 1sc in each st only through the inner loops. Insert in each st until you reach the last ch 2 space on the right side.
When you reach the ch 2 space on the right side, you should reach the top part of the butterfly now. From here, you will only work through one piece at a time instead of joining it as this will the opening for the pouch. Insert a sl st in each st until you reach the stitch before the middle stitch of the butterfly (you will have to freestyle this yourself. Just make sure that the strap that you're gonna make is at the centre), then ch 30 and insert a sl st into the next st skipping the middle stitch. Continue making a sl st in each stitch all around to the other piece of the butterfly. You will stop at the last stitch before you reach the middle stitch (the same as the other piece) then ch 4. Continue sl st until the end (the last sl st should be in the ch 2 space).
From here you will make the net that hold the cup (called a mermaid stitch).
Round 1: Please note that all of the stitches will be work on the piece that has 50 chains. Basically this will only be work on one side of the butterfly. (ch 9, sk 9, 1sc in the 10th st) x 6, ch 5, 1 ttr into the ch 2 space.
Round 2 - 5:
★ From here mark the first stitch of each round as it's gonna be hard to identify it when you need to insert a stitch into it.
Ch 1, 1sc in the ch 9 space. (ch 9, sk 9, 1sc in the 10th st) x 6, ch 5, 1 ttr into first 1sc.
Round 6: Ch 1, insert 3sc into the first space. (Ch1, insert 5sc into the next space) x 2, ch 50, insert 3sc in the next space (push these single crochets to the left to create more space for the strap, (ch1, 5sc into the next space) x 3, ch 50, sl st into the first stitch of this round.
Round 7: Insert sl st in each st (including the strap), end with a sl st in the first st.
★ Fasten off. cut your yarn and weave in the excess yarn.
To learn how to put the net inside the pouch go to this timestamp (46:15)
You're done!!
From creator
Hi! Haly here, well done finishing the pattern. I'm so proud of you 🩷 Thank you for visiting my site and give my pattern a lot of love. I won't be here if it's not for you!! If you create the pattern and post it on any social media please tag me @muciestudio I would love to see all your creations and you don't know happy I am seeing each one of your posts 🥹🫶🏻 Feel free to reach out if you have any questions, I would be happy to help!
Latest crochet pattern!


You saw. You came. You crocheted.
Thank you for visiting!
