
Dec 25, 2025
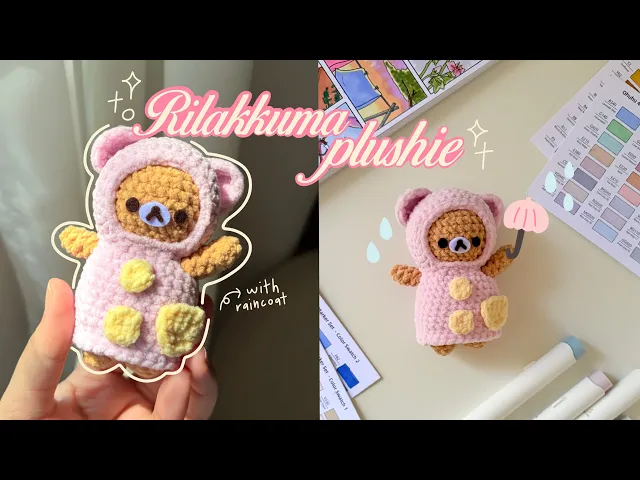
How to crochet Rilakkuma keychain / plushie in a rain coat


Welcome and welcome back to Mucie Studio! Today, we're going to work on a crochet project that is a part of my childhood and until now. I loveee Rilakkuma my whole life and I have a big Rilakkuma which I always bring with me to sleep (it actually look beat up). I can't live without it nor can I sleep without it. I am literally attach to it 😭 I literally wondered why I never make a proper Rilakkuma crochet tutorial so here I am! I even add a cute accesory to it which is a rain coat. I wanted this project to be approachable, even if you’re not an advanced crocheter. So I attach an extra guidance below so even if you're a beginner you can give it a try! But it will be a little hard especially the rain coat. So, take your time and enjoy the process. Now let's start!
I LOVE RILAKKUMA SO MUCH


✿ Copyright
Please do not copy or redistribute this pattern as your own. This Rilakkuma in a rain coat crochet pattern belongs to me, @mucie.studio. You may sell the finished items made using this pattern! Just please give me credit to help support me and my art. This will help me create more patterns for you in the future!
Watch the video below and crochet along with me! I recommend you watch the video while keeping the pattern open to make your crocheting process easier! <3
✿ Notes
‣ This pattern uses US terminology.
‣ Weave in any excess yarn.
✿ Materials
1. Yarn: I recommend you use a chenille / microfiber yarn which is suitable with 3 mm hook. The yarn I use is 2mm in size (I measured it with ruler). I prefer to just measure the yarn size like this so that everyone can get access to the yarn as every country has different terms for yarn size.
2. Crochet hook: 3 mm
3. Darning needle
4. Scissors
Felt fabric
Stuffing
Stitch marker
Optional: glue. You can also sew the pieces if you dislike using glue.
✿ Stitches & Abbreviation
Ch: Chain
St(s): Stitches
Sc: Single crochet
Sk: Skip
Inc: Increase
Dec: Decrease
Hdc: Half double crochet
Sl st: Slip stitch
✿ Rilakkuma and a rain coat crochet pattern ✿
Rilakkuma
i) Head
Round 1: In a magic ring, insert 6sc
Round 2: Inc x 6 <12>
Round 3: (Inc, 1sc) x 6 <18>
Round 4: 1sc, (Inc, 2sc) x 5, Inc, 1sc <24>
Round 5: (Inc, 3sc) x 6 <30>
Round 6 - 10: Insert 1sc in each st <30>
Round 11: (Dec, 3sc) x 6 <24>
Round 12: 1sc ,(dec, 2sc) x 5, dec, 1sc <18>
Round 13: (dec, 1sc) x 6 <12>
★ Fasten off and leave a long end for sewing the head onto the body. Then, stuff the head.
ii) Legs
Round 1: In a magic ring, insert 6sc
Round 2: (Inc, 1sc) x 3 <9>
Round 3: Insert 1sc in each st <9>
Fasten off.
★ Repeat and make 1 one more but DON'T CUT. So you will have one leg that has been cut and one that is still attach to your yarn ball.
iii) Body
This is a continuation for the legs. We're going to join the legs and continue making the body.
Round 4: With the second leg that is still attach to the yarn ball, join the legs by making a sl st in the other leg (that has been cut). Then, continue with 8sc, sc2tog, 9sc <18>
Round 5: 1sc, (Inc, 2sc) x 5, Inc, 1sc <24>
Round 6: (Inc, 3sc) x 6 <30>
Round 7 - 9: Insert 1sc in each st <30>
Round 10: (Dec, 3sc) x 6 <24>
Round 11: Insert 1sc in each st <24>
Round 12: 1sc, (Dec, 2sc) x 6, Dec, 1sc <18>
Round 13: (Dec, 1sc) x 6 <12>
★ Fasten off and stuff the body. Weave in any excess yarn.
iv) Hands
Round 1: In a magic ring, insert 6sc
Round 2 - 6: Insert 1sc in each st <6>
★ Fasten off and leave a long end for sewing. Make 2 pieces so that you'll have a matching pair of hands.
Assembly
i) How to sew the head and body
Align the two ends where we fasten off. Make sure all the stitches are align. With your darning needle, insert your yarn through the middle of the stitches (the stitches of the head and body). Insert the yarn in each stitch until the end. Lastly, weave in the excess yarn. For an extra guidance I have a video on top that you can refer to.
i) How to sew the hands onto the body
From the neck line, you will skip 2 rows. Then, each hand has 6 stitches. Sew only 3 stitches onto the body, just pinch the hand slightly as you attach it. For an extra guidance I have a video on top that you can refer to.
Rain coat
I'm using a pink yarn for the rain coat.
i) Hood
Round 1: In a magic ring, insert 6sc
Round 2: Inc x 6 <12>
Round 3: (Inc, 1sc) x 6 <18>
Round 4: 1sc, (Inc, 2sc) x 5, Inc, 1sc <24>
Round 5: (Inc, 3sc) x 6 <30>
Round 6 - 9: Insert 1sc in each st <30>
Round 10 - 14: Ch 1 and turn your work. Make 25sc
★ Ignore the extra 5 stitches. You will leave it as this is going to be the opening for the Rilakkuma's neck.
Round 15: (Dec, 3sc) x 5 <20>
★ The total stitches doesn't include the extra 5 stitches that we ignored.
Round 16: Ch 5, sl st into the first stitch on the other side. Then, continue with the pattern below.
Ch 1 and turn your work. (Dec, 2sc) x 6 <18>
Round 17: Ch 1, (Inc, 2sc) x 6, sl st <24>
Round 18: Ch 1, Inc, 3sc, Inc, ch 3 and place the chains under the arms, sk 3 st and make an Inc in the next st, 3sc, (Inc, 3sc) x 2, ch 3 and place the chains under the arms, sk 3 st and make an Inc in the next st, 3sc
Round 19: Insert 1sc in each st, in the ch 3 insert 3sc <30>
Round 20 - until it reach the leg: Insert 1sc in each st <30>
This depends on your yarn and hook size. I did mine until round 28 but you can decide if you do more or less.
★ Fasten off and weave in any excess yarn.
ii) Ears
I am going to use the same pink yarn I use for the rain coat.
Round 1: In a magic ring, insert 6sc
Round 2: Ch 1 and turn your work. Inc x 6 <12>
Round 3: Ch 1 and turn your work. Dec x 6 <6>
★ Fasten off and leave a long end for sewing. Make 2 pieces so that you'll have a matching pair of ears.
▸ Assembly
Placement for the ears on the rain coat
I sew the ears onto the hood around Round 8–9. I usually just eyeball the placement and adjust until it looks nice. Feel free to change the positioning if you think another spot looks better. I also leave about 6 stitches of space between the two ears.
iii) Buttons
Round 1: In a magic ring, insert 6sc
★ Fasten off and glue the buttons on the rain coat. If you're not comfortable with using glue, feel free to sew it onto the rain coat. Make two buttons.
I place the first button on Round 19-21 and the second button on Round 24-26. Make sure to place it in the middle of the Rilakkuma's face.
iv) Pocket
Round 1: Ch 7 and start in the 2nd chain. Insert 1sc in each st <6>
Round 2 - 4: Ch 1 and turn your work. Insert 1sc in each st <6>
Round 5: Insert 1sc all around but only at the bottom.
★ Fasten off and glue the pocket on the rain coat. If you're not comfortable with using glue, feel free to sew it onto the rain coat.
I place the pocket on Round 23-27 and I place it on the right side of the rain coat.
The last step is to cut the eyes, nose and mouth. Also the white oval part for the Rilakkuma! I use felt fabric for all of it and glue it with fabric glue. Finally, you're done!!
From creator
Hi! Haly here, well done finishing the pattern. I'm so proud of you 🩷 Thank you for visiting my site and give my pattern a lot of love. I won't be here if it's not for you!! If you create the pattern and post it on any social media please tag me @muciestudio I would love to see all your creations and you don't know happy I am seeing each one of your posts 🥹🫶🏻 Feel free to reach out if you have any questions, I would be happy to help!
Latest crochet pattern!


You saw. You came. You crocheted.
Thank you for visiting!
