
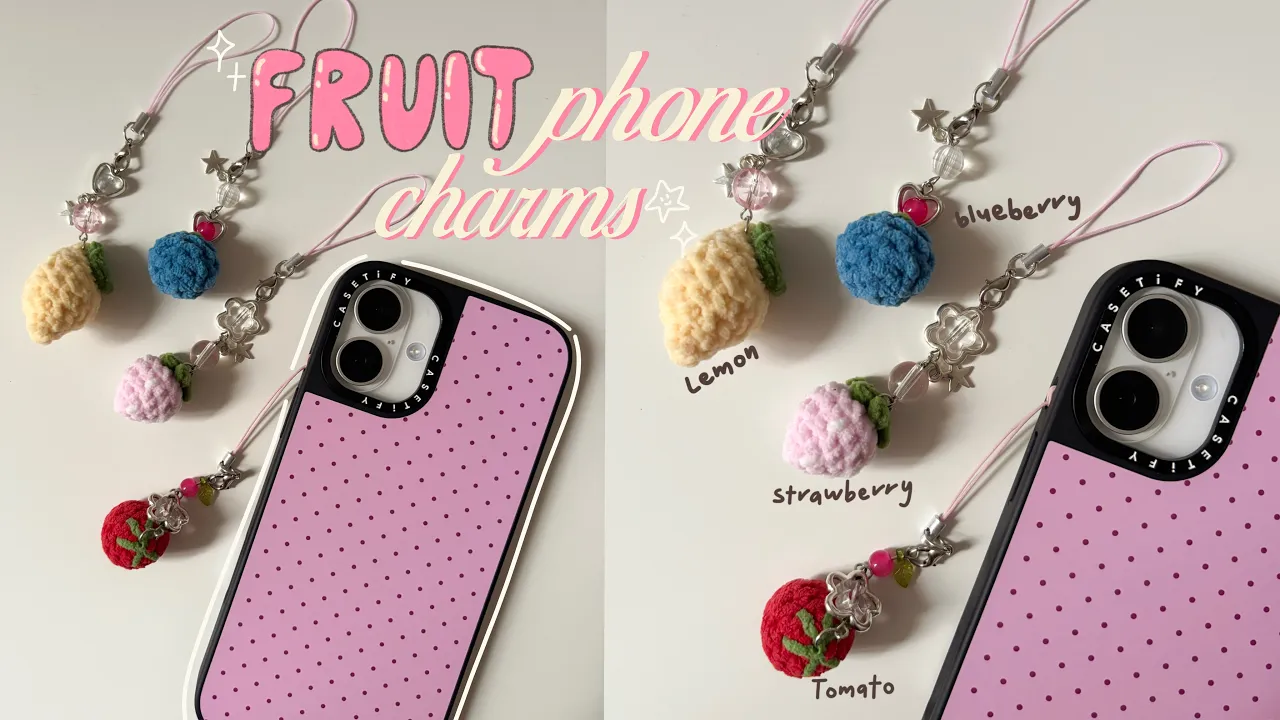
Crochet fruit phone charm tutorial 🍓


Looking for a cute and easy crochet project? This free crochet fruit phone charm tutorial is perfect for you! In this blog post, I’ll guide you through crocheting mini strawberry, tomato, orange, blueberry, and lemon charms!! These small amigurumi fruit charms are beginner-friendly, quick to make, and perfect for phone straps, keychains, bags, or handmade gifts. The pattern is simple and great for using scrap yarn. Plus, they make adorable aesthetic accessories that are trending right now! If you prefer a visual guide, you can also follow along with my full YouTube tutorial. Start crocheting your own mini fruit collection today! 🍓🍊🍋🫐🍅
✿ Copyright
Please do not copy or redistribute this pattern as your own. This fruit phone charm crochet pattern belongs to me, @mucie.studio. You may sell the finished items made using this pattern! Just please give me credit to help support me and my art. This will help me create more patterns for you in the future!
★ I don't lie when I said I carry this everywhere ★


Watch the video below and crochet along with me! I recommend you watch the video while keeping the pattern open to make your crocheting process easier! <3
✿ Notes
‣ This pattern uses US terminology.
‣ Weave in any excess yarn.
✿ Materials
Yarn: I recommend you use a chenille / microfiber yarn which is suitable with 3 mm hook. The yarn I use is 2mm in size (I measured it with ruler). I prefer to just measure the yarn size like this so that everyone can get access to the yarn as every country has different terms for yarn size.
Crochet hook: 3mm
Darning needle
Scissors
Stuffing
Stitch marker
Optional: Glue (you can also sew the pieces if you dislike using glue)
✿ Stitches & Abbreviation
Ch: Chain
St(s): Stitches
Sc: Single crochet
Sk: Skip
Inc: Increase (2 single crochet in one stitch)
Dec: Decrease
Hdc: Half double crochet
Sl st: Slip stitch
✿ Fruit phone charms crochet pattern ✿
Fake magic ring = slip knot, ch 2. Then, work the stitches in the second ch
i) Strawberry
Main body
Round 1: In a magic ring or a fake magic ring, insert 4sc
Round 2: Inc x 4 <8>
Round 3: (Inc, 1sc) x 4 <12>
Round 4 - 5: 1sc in each st <12>
Round 6: Dec x 6 <6>
★ Fasten off by making a sl st into the first stitch of round 6. Cut the yarn leave some end and pull through the loop on the hook. With your darning needle, sew the hole close by inserting it thorough the middle of the V of each stitch. Then, pull to tighten it. Weave in the excess yarn by inserting it multiple times through the body and cut (leave 1 inch of yarn). Poke in the excess into the body.
Strawberry leaves
Round 1: Ch 3, start in the 2nd st. Make sl st
Round 2: Ch 2, start in the 2nd st. Make 2 sl st (in the ch and in the middle space) x 4
★ Cut the yarn and leave a long tail for sewing. Sew the leaves onto the strawberry, make sure the leaves is at the centre of the main body.
Next, sew some strawberry seeds onto the main body with a white yarn (40:38) timestamp on the video. Assemble a phone charm keychain into it or you can make it yourself by using yarn (1:02:38) timestamp on the video.
ii) Tomato, blueberry, orange
Choose the yarn color according to what fruit you want to make.
Round 1: In a magic ring or a fake magic ring, insert 5sc
Round 2: Inc x 5 <10>
Round 3 - 5: 1sc in each st <10>
Round 6: Dec x 5 <5>
★ Fasten off by making a sl st into the first stitch of round 6. Cut the yarn leave some end and pull through the loop on the hook. With your darning needle, sew the hole close by inserting it thorough the middle of the V of each stitch. Then, pull to tighten it. Weave in the excess yarn by inserting it multiple times through the body and cut (leave 1 inch of yarn). Poke in the excess into the body.
Sew the leaves onto the tomato/blueberry/orange (15.44) timestamp on the video.
iii) Lemon
Main body
Round 1: In a magic ring or a fake magic ring, insert 4sc
Round 2: 1sc in each st <4>
Round 3: Inc x 4 <8>
Round 4: (Inc, 1sc) x 4 <12>
Round 5 - 7: 1sc in each st <12>
Round 8: (Dec, 1sc) x 4 <8>
Round 9: Dec x 4 <4>
★ Fasten off by making a sl st into the first stitch of round 6. Cut the yarn leave some end and pull through the loop on the hook. With your darning needle, sew the hole close by inserting it thorough the middle of the V of each stitch. Then, pull to tighten it. Weave in the excess yarn by inserting it multiple times through the body and cut (leave 1 inch of yarn). Poke in the excess into the body.
Lemon leaves
Round 1: Ch 4, start in the 2nd st, 1sc, 1hdc, 1sc, ch 1, 1sc, 1hdc, 1sc, ch 1, sl st into the first st.
★ Tie few knots at the back to secure the ends. Glue the leaves onto the lemon.
You're done!!
From creator
Hi! Haly here, well done finishing the pattern. I'm so proud of you 🩷 Thank you for visiting my site and give my pattern a lot of love. I won't be here if it's not for you!! If you create the pattern and post it on any social media please tag me @muciestudio I would love to see all your creations and you don't know happy I am seeing each one of your posts 🥹🫶🏻 Feel free to reach out if you have any questions, I would be happy to help!
Latest crochet pattern!


You saw. You came. You crocheted.
Thank you for visiting!
