
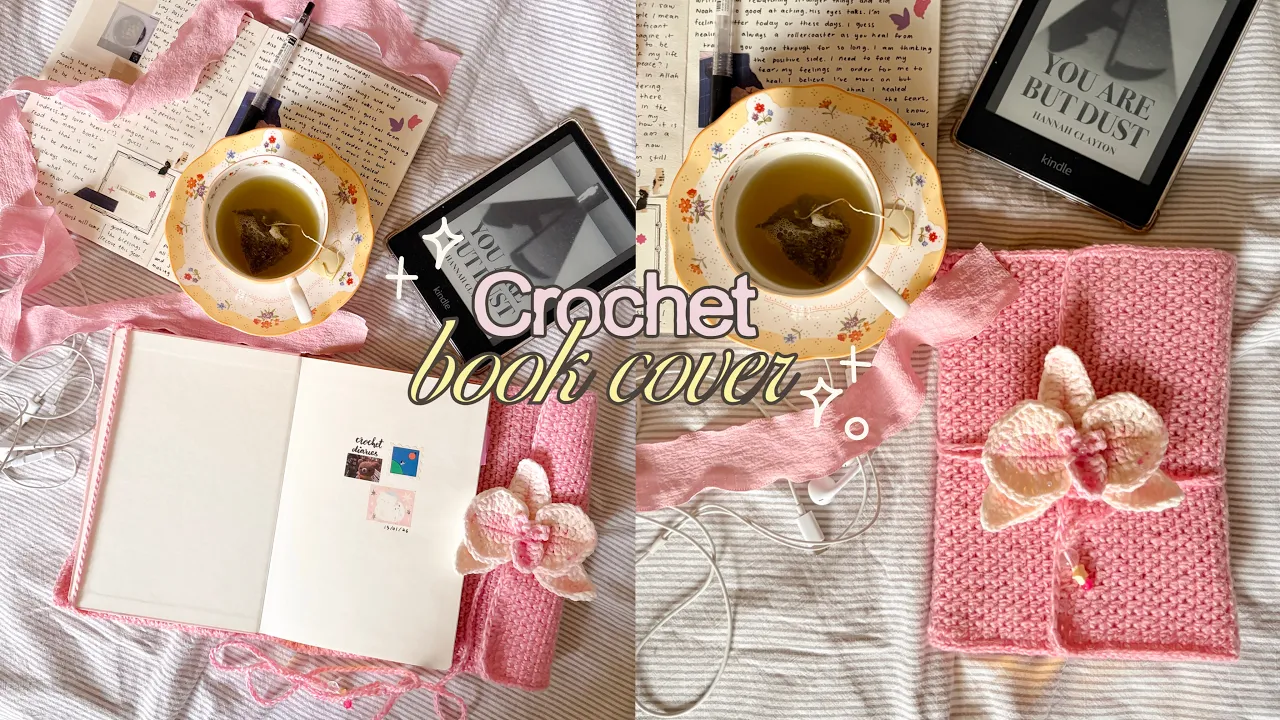
How to crochet orchid book cover


Give your favourite book a little crochet makeover with this cute orchid book cover! 🌸 This crochet book cover features an orchid in the centre, with a wrap around design that keeps your book snug and protected. I’ve always loved orchids, so I wanted to find a way to incorporate one into a book project and this was the result! It’s a fun project to make for yourself, or as a handmade gift for someone who loves books and flowers. I’ll walk you through each step of making the crochet book cover, including the straps to keep the book in place and the orchid. Grab your yarn and crochet hook, and let’s get started!!
✿ Copyright
Please do not copy or redistribute this pattern as your own. This orchid book cover crochet pattern belongs to me, @mucie.studio. You may sell the finished items made using this pattern! Just please give me credit to help support me and my art. This will help me create more patterns for you in the future!
Watch the video below and crochet along with me! I recommend you watch the video while keeping the pattern open to make your crocheting process easier! <3
✿ Notes
‣ This pattern uses US terminology.
‣ For the book cover from round 2 until the end, start the round with a chain 1 and turn your work.
‣ Weave in any excess yarn.
✿ Materials
Any yarn works for the book cover but I'd recommend a slightly thicker yarn so that it can hold it shape
Crochet hook that is suitable with the yarn
Orchid:
5-ply yarn
3mm crochet hook
Scissors
Darning needle
Glue
Optional: beads
✿ Stitches & Abbreviation
Ch: Chain
St(s): Stitches
Sc: Single crochet
Dc: Double crochet
Tc: Treble crochet
Sl st: Slip stitch
✿ Orchid book cover crochet pattern ✿
★ In every round, you will always start and end with 1sc. This will make the book cover edge straight.
i) Book cover
Part 1:
Round 1: Chain the length of your book and add an extra inch cause this pattern will make the chains shorter than the normal length. Make sure the total number of chains are an even number.
Start in the 2nd chain and make 1sc.
(Ch 1 and skip, 1sc in the next st) x continue this until the end.
Round 2: Ch 1 and turn your work. Please note that you will make the 1sc in the ch 1 space. Basically you will ch 1 and skip the 1sc of the last round. Then, you will insert 1sc in the ch 1 space.
Start in the 2nd and make 2sc.
(Ch 1 and skip, 1sc in the next st) x continue this until you have 1 st left.
In the last st, insert 2sc.
Alternate Round 1 and Round 2 until it can wrap around your book and overlaps in the middle.
Part 2:
Border
Once you're done with the book cover, we will make the border. If you need a visualization of these steps, please watch the video guide above.
Long side 1: Ch 1 and insert 1sc in each st and rows until you're left with 2 rows cause you will be needing it when we make the border on the short side.
Short side 1 (this is the front of your book cover that overlaps in the middle): Skip the 2 rows. Insert 1sc through the top of the inverted V only. Skip the ch 1 spaces as you work the single crochets.
Long side 2: Skip 2 rows. Insert 1sc in each st and rows.
Short side 2: Insert 1sc in each st.
★ Cut your yarn and pull through. Make a fake stitch if you want it to look neater. Weave in excess yarn.
Part 3:
Strap
Make sure you work the strap in the wrong side of the book cover. You will need to make 2 straps for the front and back book flap.
The first strap (this is for the inner book cover):
From the corner count 5 stitches and attach your yarn into the 5th stitch. Then, on the other side count 5 stitches and mark the 5th stitch with a stitch marker.
In the stitch where you attached the yarn, chain until it is long enough to reach the other side with a stitch marker. Make sure the chains are tight so that it can hold the book in place. I'd recommend you test it out with your book and see if you need to adjust the chains. Finally, make a sl st into the stitch that we marked. Fasten off.
The second strap (front of the book cover that will overlaps in the middle):
Insert the book into the first strap and eyeball where you need to place the 2nd strap. Repeat the same step as the first strap. Fasten off.
Strap 2:
This is the strap that will wrap around the book to secure the book in place.
At the front of the book cover, attach your yarn to the centre of the 2nd row. Chain until the chain is long enough to wrap around your book twice. Test the length with the book inserted into the cover to make sure it fits properly. Once you’re happy with the length, fasten off.
ii) Orchid
3 petals at the back:
Round 1: In a magic ring, (ch 13, 1sc in each, sl st) x 3
Round 2: Ch 1, (sc, 2 hdc, 2dc, 2 tc, 2dc, 2hdc, sc, ch 2, sc, 2hdc, 2dc, 2 tc, 2dc, 2hdc, sc) x 3
2 petals at the front:
Round 1: In a magic ring, (ch 10, 1sc in each st, sl st) x 2
Round 2: Ch 1, (sc, hdc, 5dc, hdc, sc) x 4
Round 3: Ch 1, 2slst, 2dc inc, 1 tc inc, 2dc, hdc, sc, ch 2, sc, hdc, 2dc, tc inc, 2dc inc, 2 slst
Little 3 petals at the front:
Round 1: In a magic ring, Ch 4, 4 sl st, ch2, 3dc, 4dc in the same st, 3dc, ch 2 sl st into the middle
Assembly
Glue the pieces together and I added some colors to my petals with chalk. I grind it up into a powder and brush it little by little.
You're doneeee! I'm so proud of you for making it through!! Hope to see you again 🫶🏻
From creator
Hi! Haly here, well done finishing the pattern. I'm so proud of you 🩷 Thank you for visiting my site and give my pattern a lot of love. I won't be here if it's not for you!! If you create the pattern and post it on any social media please tag me @muciestudio I would love to see all your creations and you don't know happy I am seeing each one of your posts 🥹🫶🏻 Feel free to reach out if you have any questions, I would be happy to help!
Latest crochet pattern!



You saw. You came. You crocheted.
Thank you for visiting!