

Oct 19, 2025
How to crochet tomato filet market bag (works with any pixel grid)


If you’re looking for a versatile and fun crochet project, this tomato filet market bag tutorial is perfect for you. This pattern works with any pixel grid, giving you the freedom to customize your bag with your favorite designs, colors, or grid. This bag is perfect for groceries, farmer’s market trips, or everyday carry! I carry it with me whenever I go to the cafes and it's so aesthetic! I am always wearing something pink so it fits my everyday outfit! I provide a video for extra guidance but keep in mind that I am not showing how to make the tomato filet market bag from start to finish. I showed how to create it from scratch so you can customize it into any pixel grid. Below, you'll find the full tomato filet market bag and how to calculate it! But I already calculate it for you if you're making this tomato market bag! <3
I brought the bag with me to the cafe and the beach right after I finished making it! <3


✿ Copyright
Please do not copy or redistribute this pattern as your own. This tomato filet market bag crochet pattern belongs to me, @mucie.studio. You may sell the finished items made using this pattern! Just please give me credit to help support me and my art. This will help me create more patterns for you in the future!
Watch the video below and crochet along with me! I recommend you watch the video while keeping the pattern open to make your crocheting process easier! <3
✿ Notes
‣ This pattern uses US terminology.
‣ Weave in any excess yarn
✿ Materials
1. Yarn: You can use any yarn but the size of the yarn will determine the size of your bag. The bigger the yarn size, the bigger your bag turned out. The thinner the yarn, the smaller your bag is. I recommend that you use yarn that is suitable with 3.5 - 4mm crochet hook.
For my bag I used a 5-ply yarn and pair it with a mohair yarn. Then, for the tomato and leaves I used only 5-ply yarn.
2. Crochet hook: I recommend that you use 3.5 - 4mm crochet hook
3. Darning needle
4. Scissors
✿ Stitches & Abbreviation
Ch: Chain
St(s): Stitches
Sc: Single crochet
Dc: Double crochet
Dec: Decrease
Inc: Increase
Sl st: Slip stitch
✿ Tomato fillet market bag crochet pattern ✿
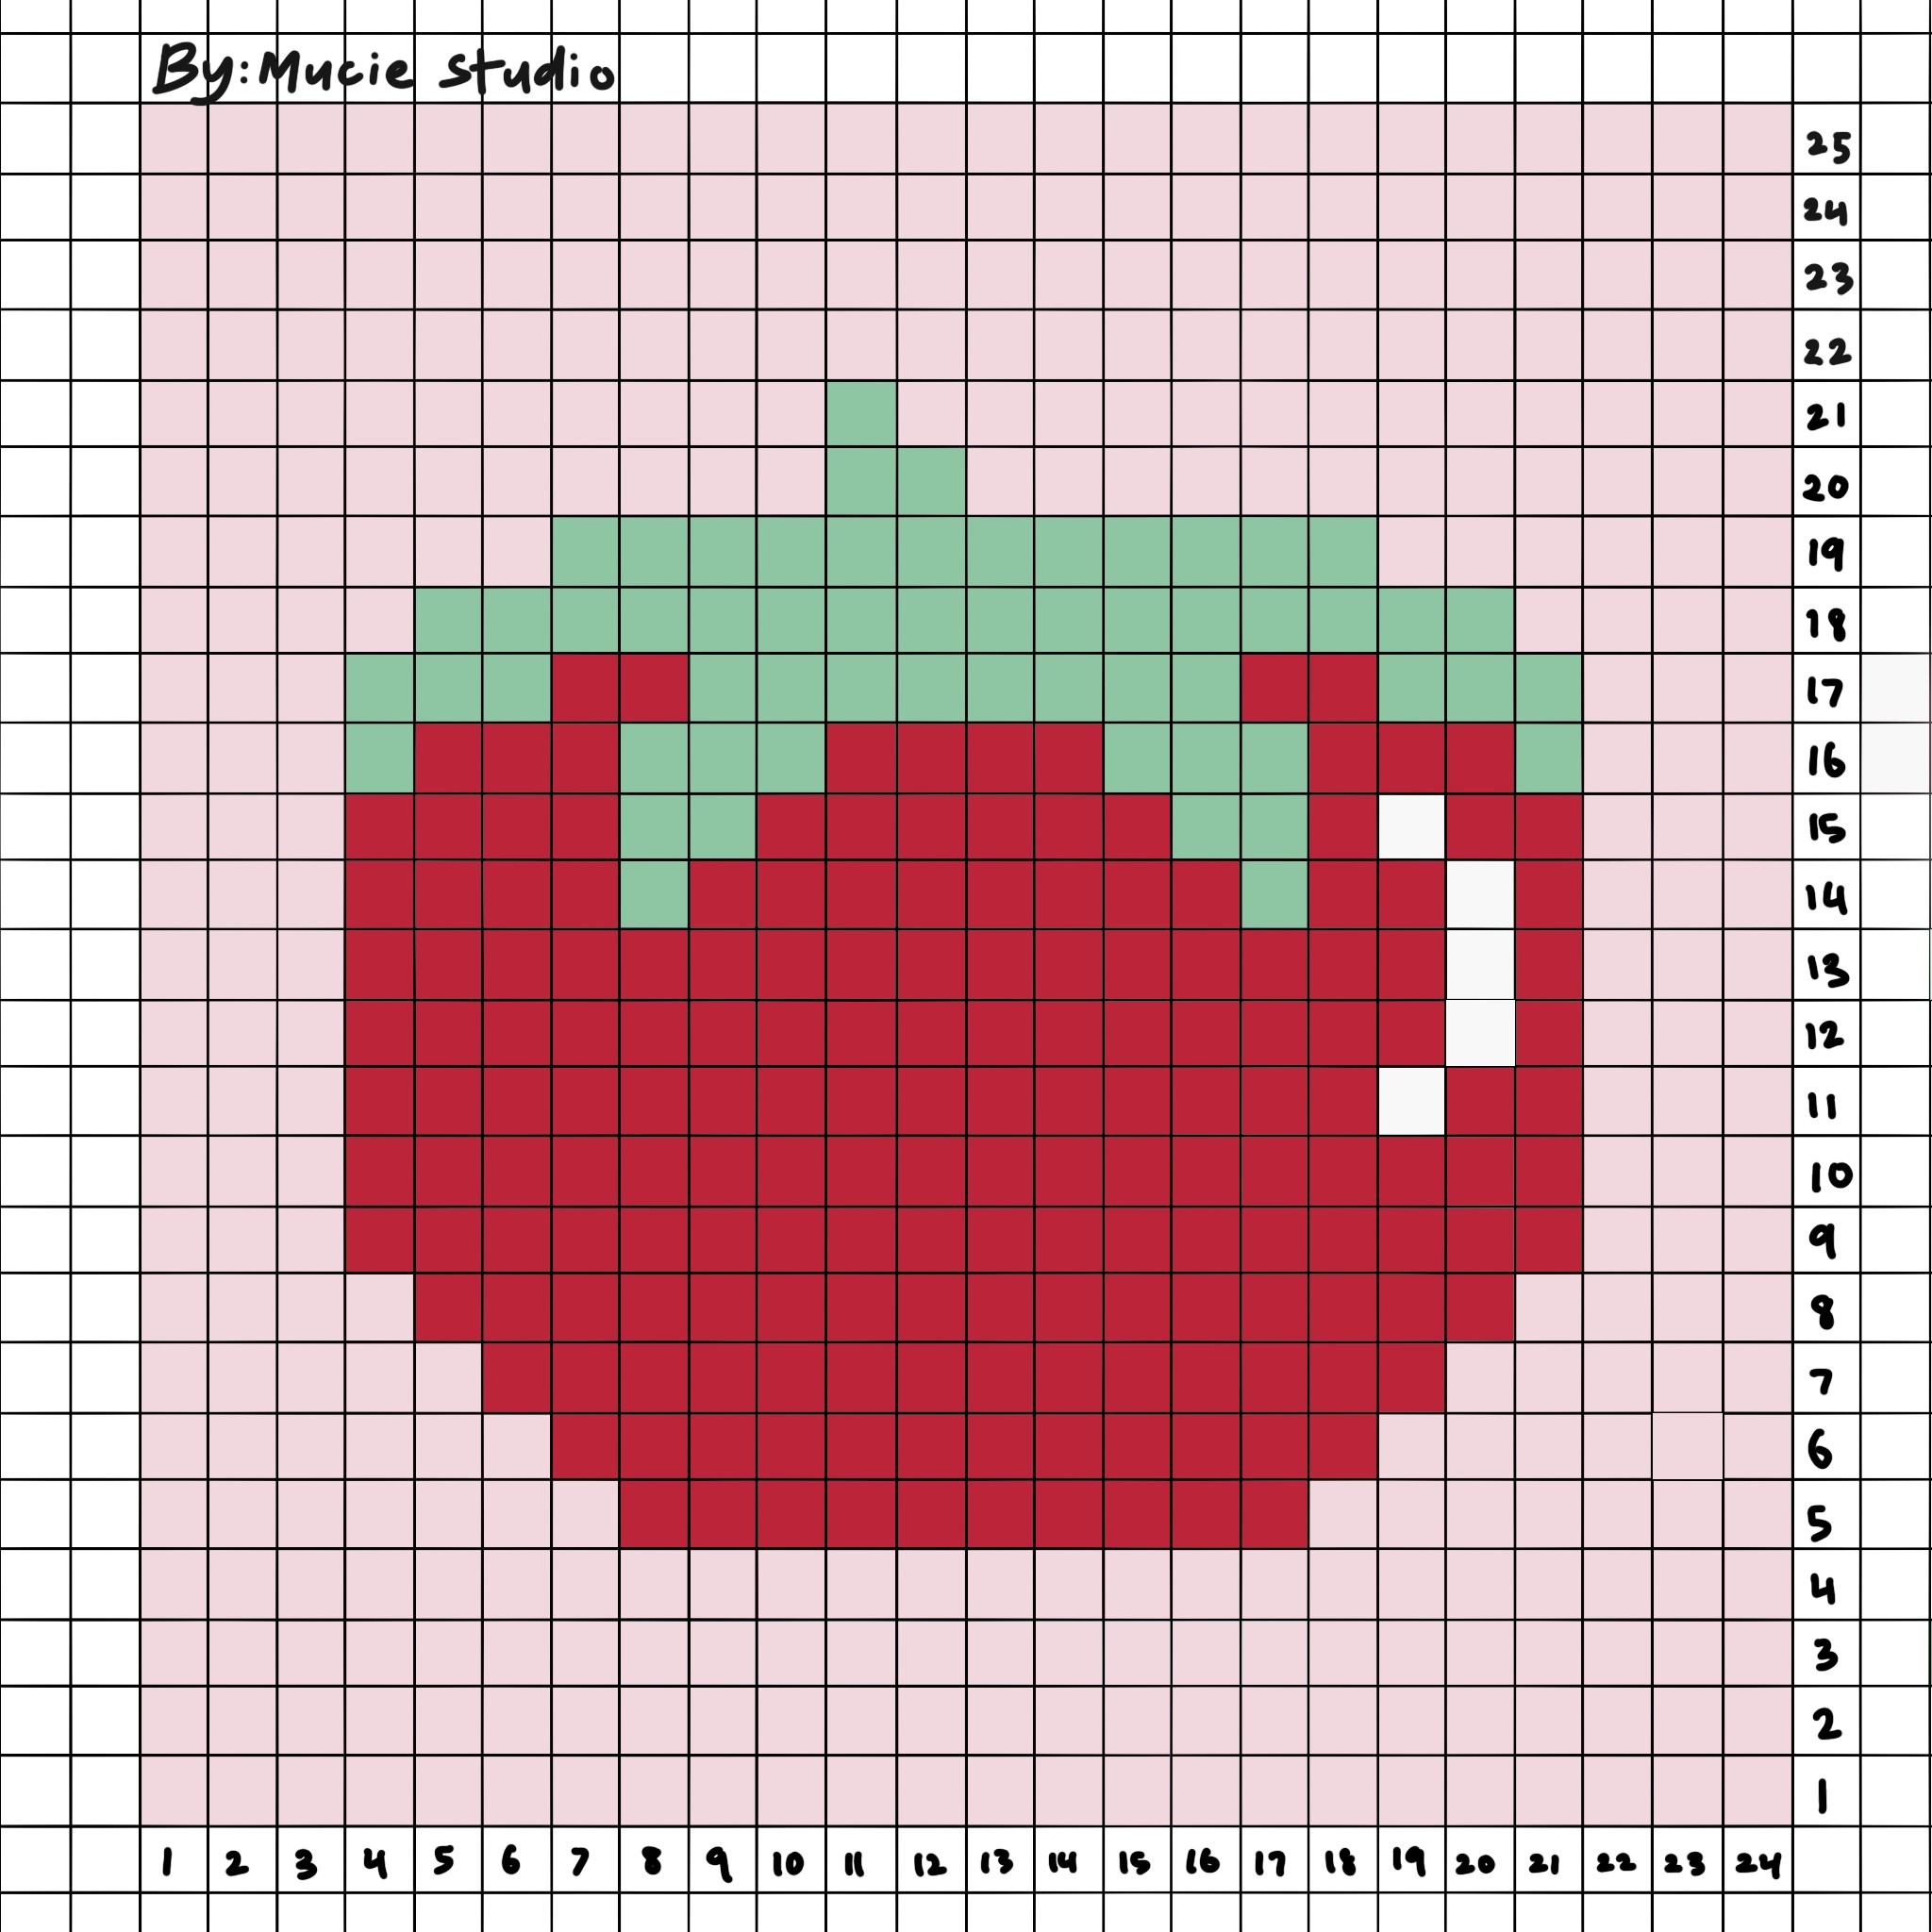
Front & back panel
Below of the grid pattern (horizontal boxes), you can see that I wrote a number in each box. On the grid we have a total of 24 square. You need to do some calculations in order to know the number of chains you need. You can find the calculations below on (i).
Notes:
I will refer to the color as Col A, Col B, Col C, and Col D.
Col A - will be the base color for your bag which is in pink yarn / squares. I will not put any reference for Col A as it will be the regular font like this (abcdefghji).
Col B- will be the color for the tomato and this indicate that before you finish off your last stitch in Col A, you will need to change your color to red yarn. Col B will be in a red font.Col C - this is the leaves on the pixel grid which will be in green yarn. Anything with eg: (Col C: 2 dc) means you're going to make it with green yarn.
Col D - this is the white squares on your pixel grid which will be made using a white yarn. Anything with eg: (Col D: 2 dc) means you're going to make it with white yarn.
i) How to calculate the number of chains you need to do
Below of the grid pattern (horizontal boxes), you can see that I wrote a number in each box. On the grid we have a total of 24 square. You need to do this calculation in order to know the number of chains you need.
Number of chains = (Total square x 2) + 2
= (24 x 2) + 2
= 48 + 2
= 50 chains
Start with Col A.
Round 1: Ch 50, start in the 2nd ch and insert 1dc. (ch 1 and skip the next st, 1 dc) x 24
By the end of this round you should have the same amount of square just like the pixel grid.
Round 2 - 4: In this pattern I will use a fake dc method which I show how to do in the video tutorial, this will make the edge straight and cleaner. However, if you’re not comfortable with doing so feel free to just ch 2 as your first dc.
Turn your work and make a fake dc in the first st, (ch 1 and skip the next st, 1 dc) x 24
Round 5: Turn your work and make a fake dc in the first st, (ch 1 and skip the next st) x 7, 19 dc (insert the dc in the 1dc stitch and the ch 1 space), 1dc, (ch 1 and skip the next st, 1dc) x 7
Round 6: Turn your work and make a fake dc in the first st, (ch 1 and skip the next st, 1 dc) x 6, 23 dc, 1dc, (ch 1 and skip the next st, 1dc) x 6
Round 7: Turn your work and make a fake dc in the first st, (ch 1 and skip the next st, 1 dc) x 5, 27 dc, 1dc, (ch 1 and skip the next st, 1dc) x 5
Round 8: Turn your work and make a fake dc in the first st, (ch 1 and skip the next st, 1 dc) x 4, 31 dc, 1 dc, (ch 1 and skip the next st) x 4
Round 9 - 10: Turn your work and make a fake dc in the first st, (ch 1 and skip the next st, 1 dc) x 3, 35 dc, 1dc, (ch 1 and skip the next st, 1 dc) x 3
Round 11: Turn your work and make a fake dc in the first st, (ch 1 and skip the next st, 1 dc) x 3, 4dc, Col D: 2dc, 29 dc, 1dc, (ch 1 and skip your next st, 1dc) x 3
Round 12: Turn your work and make a fake dc in the first st, (ch 1 and skip the next st, 1 dc) x 3, 31 dc,Col D: 2dc, 2 dc, 1dc, (ch 1 and skip the next st, 1 dc) x 3
Round 13: Turn your work and make a fake dc in the first st, (ch 1 and skip the next st, 1 dc) x 3, 2 dc, Col D: 2 dc, 31 dc, 1dc, (ch 1 and skip the next st, 1dc) x 3
Round 14: Turn your work and make a fake dc in the first st, (ch 1 and skip the next st, 1 dc) x 3, 8 dc, Col C: 2 dc, 15 dc, Col C: 2 dc, 4 dc, Col D: 2 dc, 2 dc, 1dc, (ch 1 and skip the next st, 1dc) x 3
Round 15: Turn your work and make a fake dc in the first st, (ch 1 and skip the next st, 1dc) x 3, 4 dc, Col D: 2 dc, 2 dc, Col C: 4 dc, 11 dc, Col C: 4 dc, 8 dc, 1dc, (ch 1 and skip the next st, 1dc) x 3
Round 16: Turn your work and make a fake dc in the first st, (ch 1 and skip the next st, 1dc) x 3, Col C: 2 dc, 6 dc, Col C: 6 dc, 7 dc, Col C: 6 dc, 6 dc, Col C: 2 dc, 1dc, (ch 1 and skip the next st, 1dc) x 3
Round 17: Turn your work and make a fake dc in the first st, (ch 1 and skip the next st, 1dc) x 3, Col C: 6 dc, 4 dc, Col C: 15 dc, 4 dc, Col C: 6 dc, 1dc, (ch 1 and skip the next st, 1dc) x 3
Round 18: Turn your work and make a fake dc in the first st, (ch 1 and skip the next st, 1dc) x 4, Col C: 31 dc, 1dc, (ch 1 and skip the next st, 1dc) x 4
Round 19: Turn your work and make a fake dc in the first st, (ch 1 and skip the next st, 1dc) x 6, Col C: 23 dc, 1dc, (ch 1 and skip the next st, 1dc) x 6
Round 20: Turn your work and make a fake dc in the first st, (ch 1 and skip the next st, 1dc) x 11, Col C: 5 dc, 1dc, (ch 1 and skip the next st, 1dc) x 10
Round 21: Turn your work and make a fake dc in the first st, (ch 1 and skip the next st, 1dc) x 12, Col C: 3 dc, 1dc, (ch 1 and skip the next st, 1dc) x 10
Round 22 - 25: Turn your work and make a fake dc in the first st, (ch 1 and skip the next st, 1dc) x 24
★ Fasten off
Side panel
Before you go and make the side panel, you first need to calculate the total number of rounds you need. Basically, we will join the side panel to the front/back panel. So the total of both panels have to be the same length. But since you’re making the tomato bag, I already calculated it for you.
Total number of rounds = (Total square of X-axis x 2) + (Total square of Y-axis x 4)
Total number of rounds = (24 x 2) + (25 x 4)
= 148 rounds
I'm using Col A for the side panel.
Round 1: Ch 14, start in the 2nd ch and insert 1sc
Round 2 - 148: Ch 1 and turn your work. Insert 1sc in each st
Round 149: Starting from this round, we will be making the strap.
Ch 1 and turn your work. 3 dec, 1sc, 3 dec <7>
Round 150: Ch 1 and turn your work. 1 dec, 3sc, 1 dec <5>
Round 151: Ch 1 and turn your work. Insert 1sc in each st. You will repeat Round 151 until you like the length for your strap. You need to try it on and see on the mirror. Also please take note that the side panel doesn’t count as your strap.
Once you’re done, continue with this round.
Round 1: Ch 1 and turn your work. Inc, 3sc, inc <7>
Round 2: Ch 1 and turn your work. 3 Inc, 1sc, 3 Inc <13>
Fasten off. Leave a long tail to sew the strap onto the side. Align the strap to the side panel and sew both sides together.
How to join the side panel to the front/back panel
For this step, please watch the guide video as I showed the steps in detail there. The timestamp is (41:06).
You can find extra pixel grid pattern below! <3
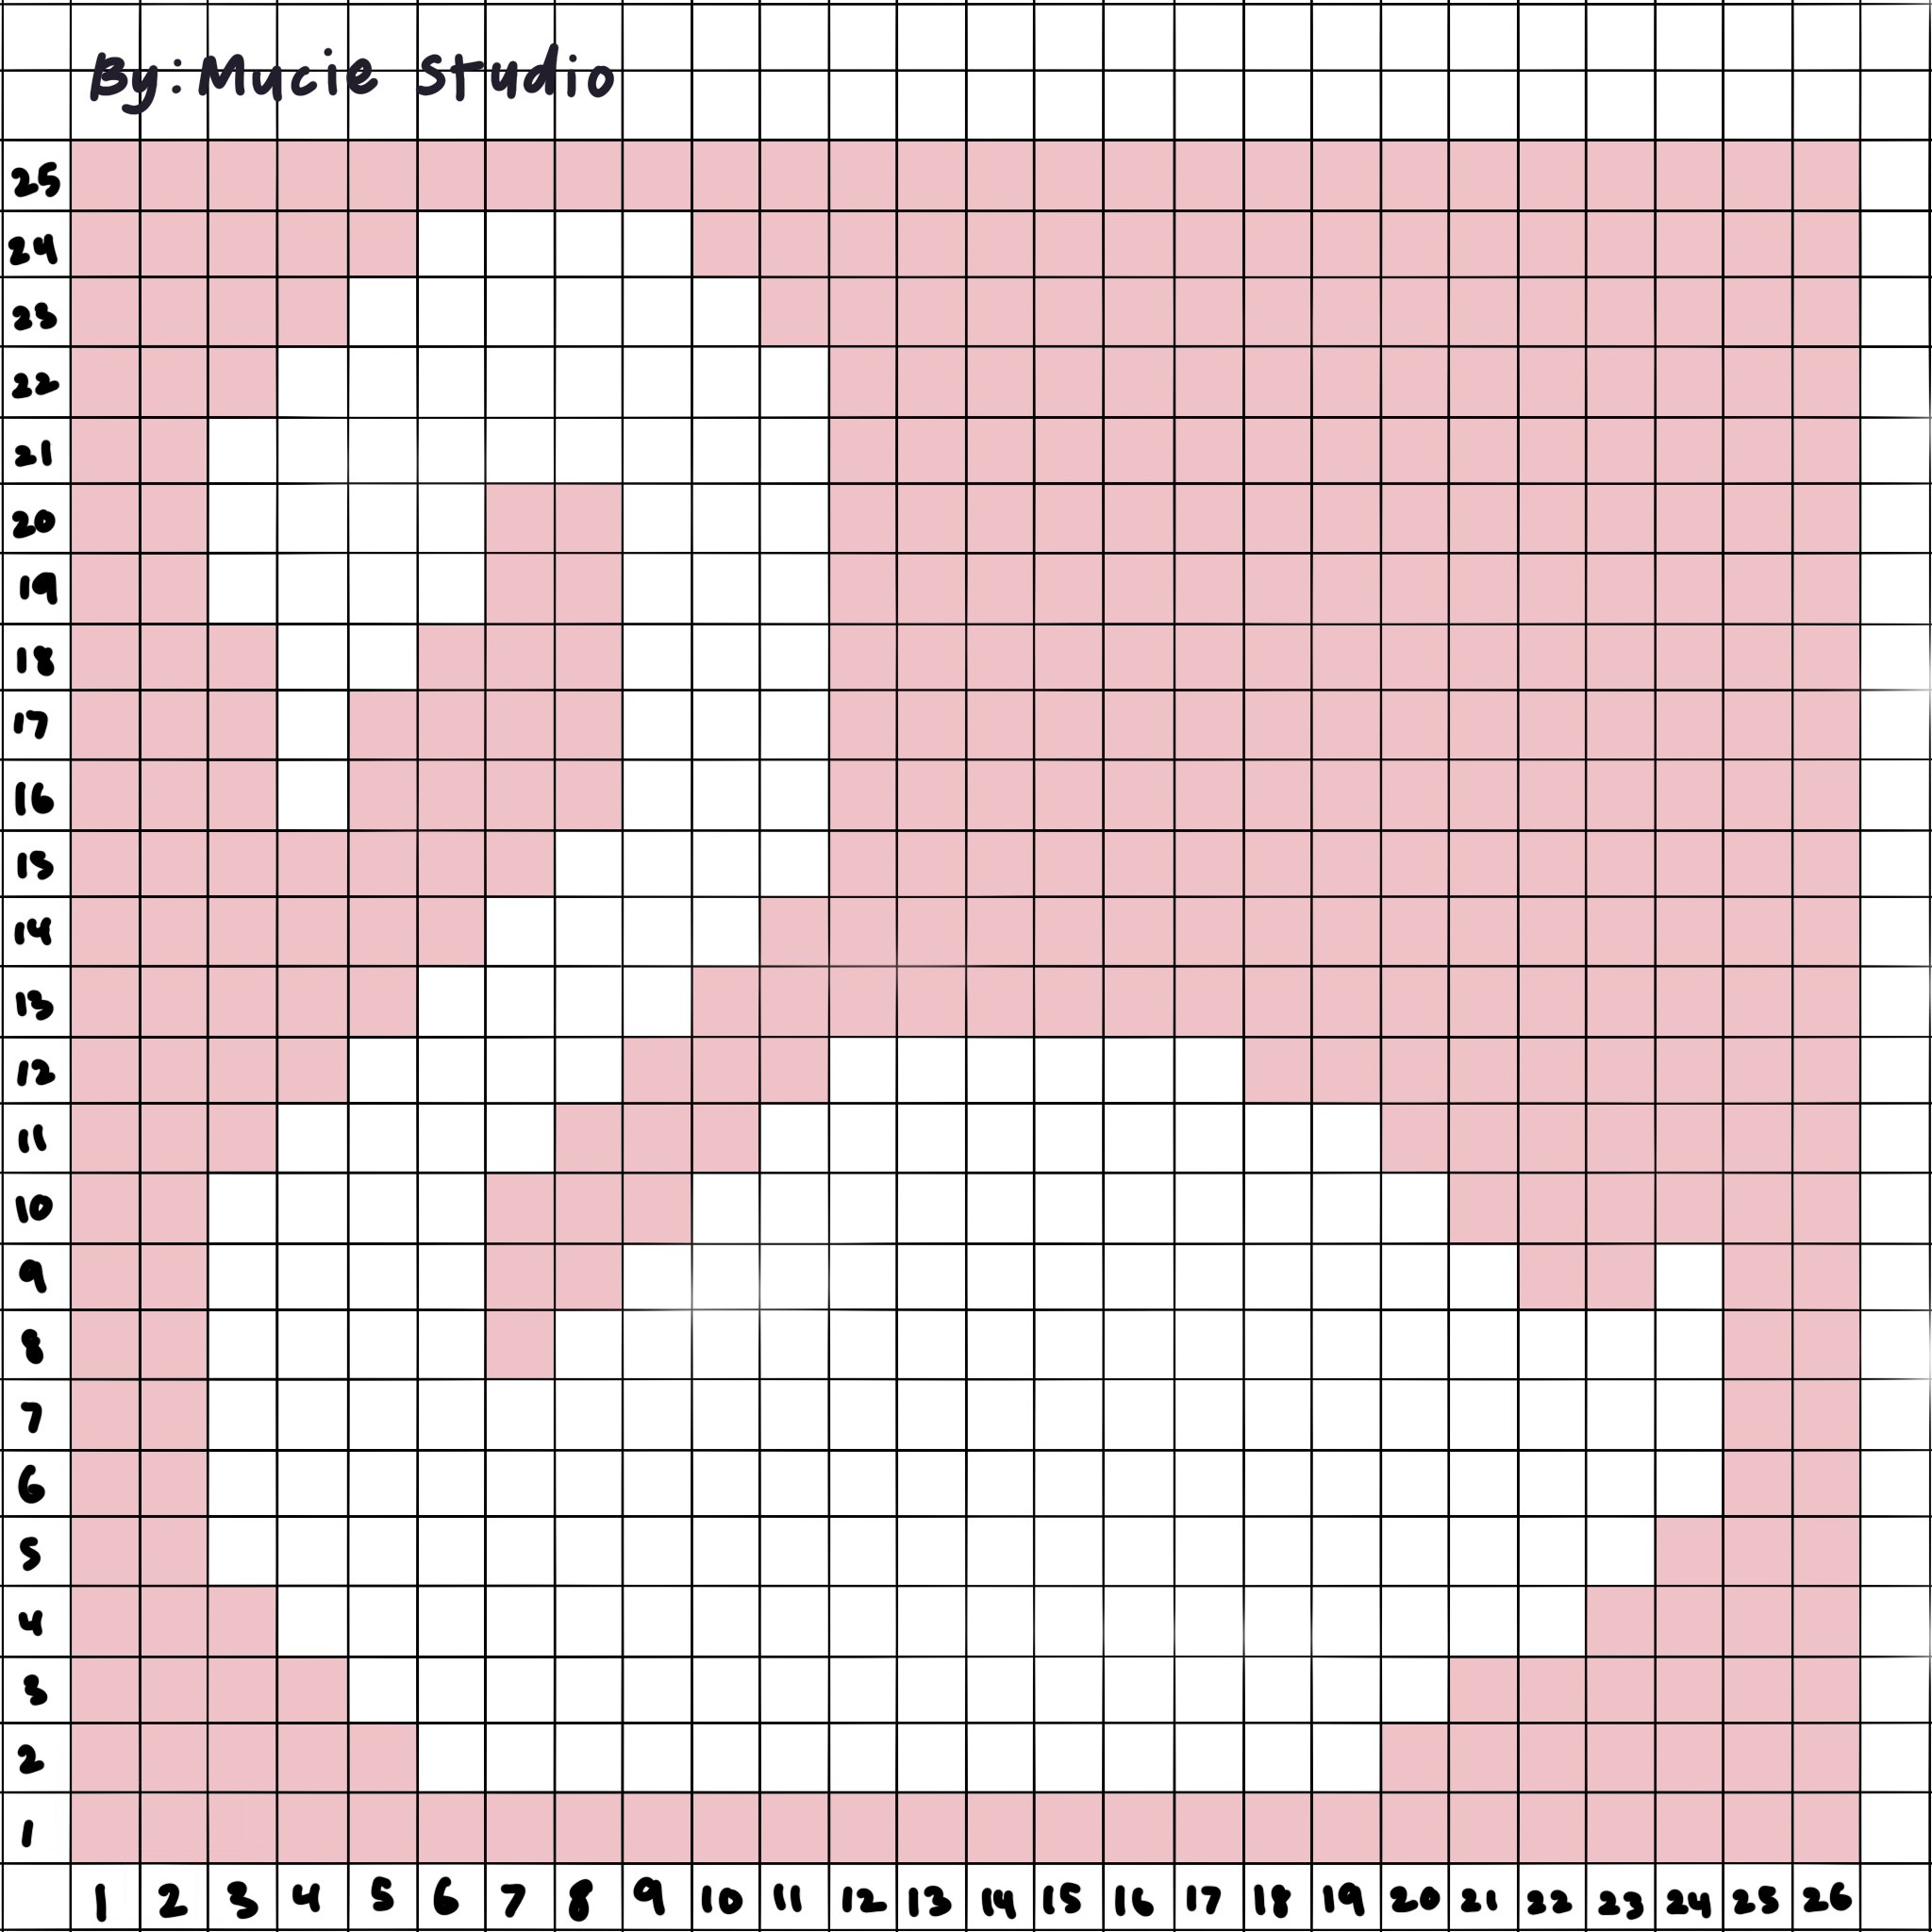
✿ Swan fillet market bag pixel grid ✿
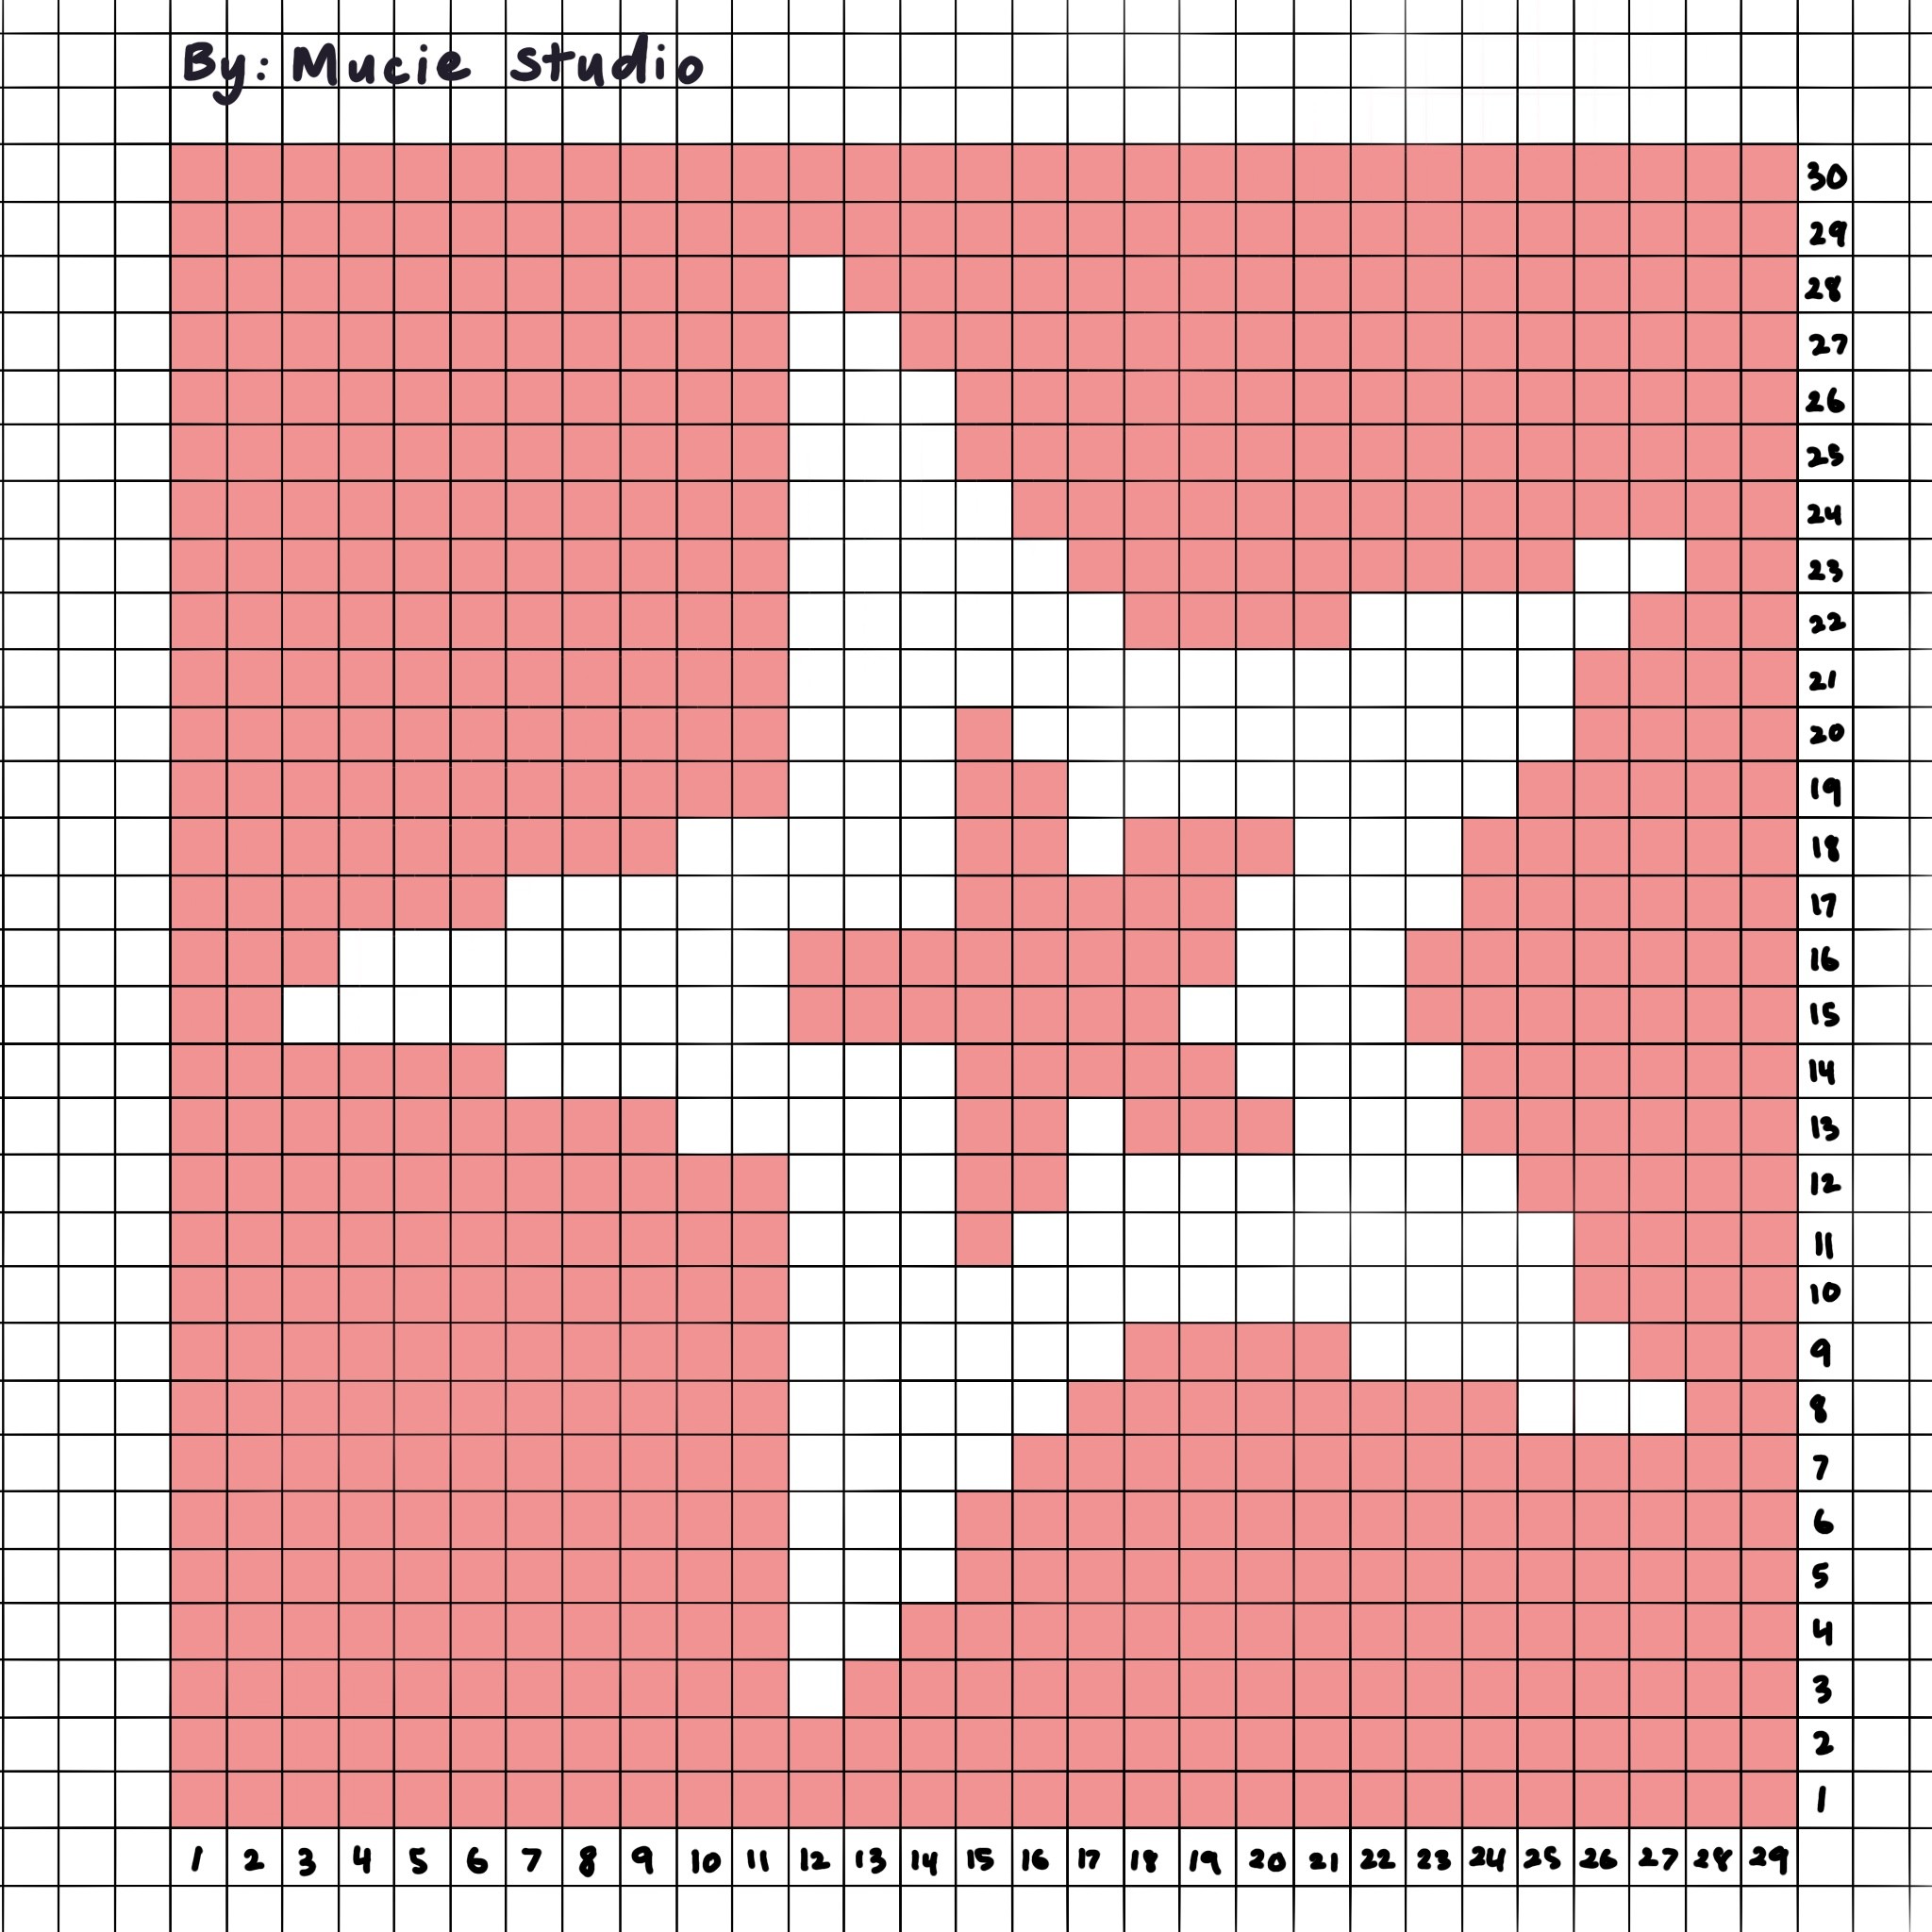
✿ Star fillet market bag pixel grid ✿
From creator
Hi! Haly here, well done finishing the pattern. I'm so proud of you 🩷 Thank you for visiting my site and give my pattern a lot of love. I won't be here if it's not for you!! If you create the pattern and post it on any social media please tag me @muciestudio I would love to see all your creations and you don't know happy I am seeing each one of your posts 🥹🫶🏻 Feel free to reach out if you have any questions, I would be happy to help!
Latest crochet pattern!


You saw. You came. You crocheted.
Thank you for visiting!
