
Dec 6, 2025
✨The ultimate organization✨ Crochet pocket tissue holder & cable organizer | quick and easy tutorial


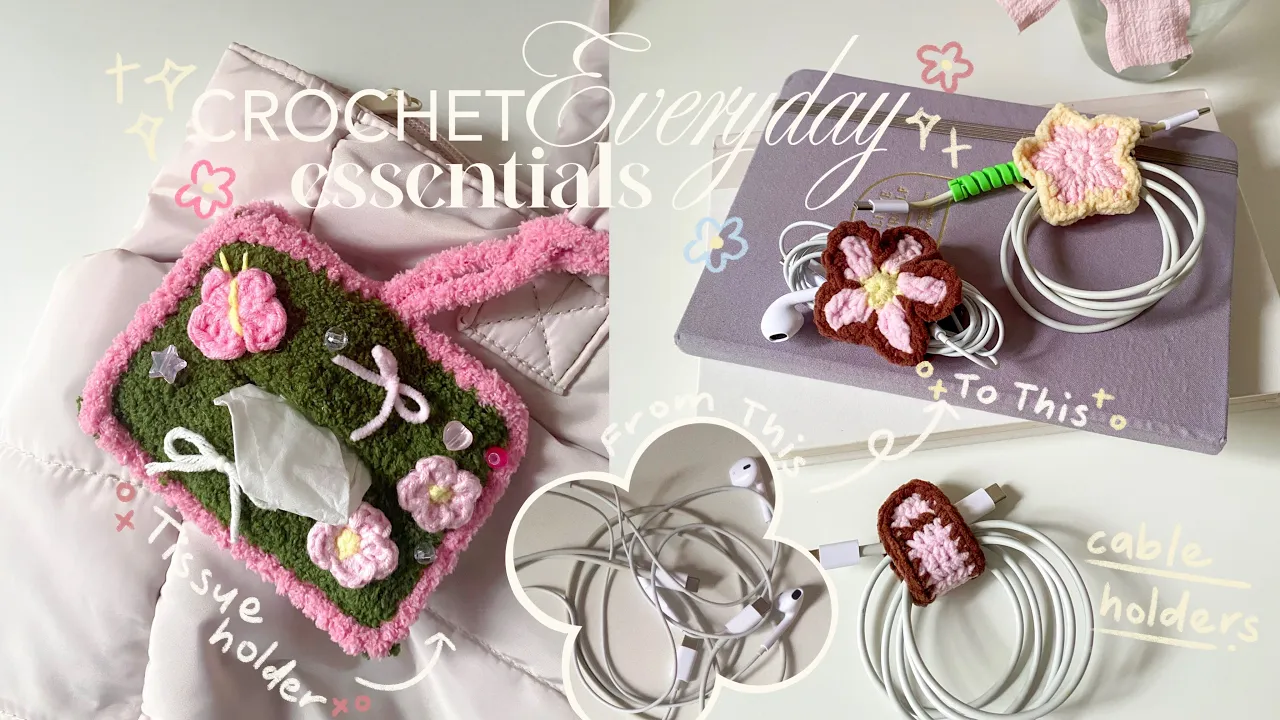
Stay organized in style with this crochet pocket tissue holder and cable organizer the two quick and easy projects that are perfect advanced beginners. These functional crochet accessories are not only practical but also cute, making them ideal for your bag, desk, or as thoughtful handmade gifts. The pocket tissue holder keeps tissues within reach and protected!! I hang the tissue holder on my bag so it's easy for me to reach for it (of course I tuck the tissue inside so it doesn't catch dust) while the cable organizer helps you store chargers, earphones, or cords neatly and tangle free. In this pattern, I’ll guide you through both projects using simple stitches and minimal sewing. By the end, you’ll have two handy crochet accessories that are quick to make and add personal touch to your everyday essentials!! <3
My personal favorite is the cable holders! I use them A LOT.


✿ Copyright
Please do not copy or redistribute this pattern as your own. This tissue pocket holder and cable organizers crochet pattern belongs to me, @mucie.studio. You may sell the finished items made using this pattern! Just please give me credit to help support me and my art. This will help me create more patterns for you in the future!
Watch the video below and crochet along with me! I recommend you watch the video while keeping the pattern open to make your crocheting process easier! <3
✿ Notes
‣ This pattern uses US terminology.
‣ Weave in any excess yarn
✿ Materials
1. Yarn:
- Cable organizers: For the flower I used a 5-ply yarn for the centre and velvet/chenille yarn for the rest. Then, for the stripe design I used velvet/chenille yarn. Lastly, for the star design I used a 5ply yarn for the main body and velvet/chenille yarn for the border
- Tissue pocket holder: I used fluffy yarn for the main body. For the flowers I used 4-ply yarn and for the butterfly I used 5-ply yarn.
2. 4.0mm and 3.0mm crochet hook
3. Darning needle
4. Scissors
5. Snap button
6. Optional:
- Glue
- Felt fabric
✿ Stitches & Abbreviation
Ch: Chain
St(s): Stitches
Sc: Single crochet
Hdc: Half double crochet
Dc: Double crochet
Tc: Treble crochet
Dec: Decrease
Inc: Increase
Sl st: Slip stitch
✿ Tissue pocket holder & cable organizers crochet pattern ✿
Tissue pocket holder
i) Back
Round 1: You will need a tissue to use as your reference. Chain until it is the same length as your tissue and add 2-3 extra chain to create some space for the tissue. This is important so that your tissue won’t get crumpled inside the tissue holder. Then, insert 1sc in each st.
This is the pattern that I did for my tissue holder:
Ch 21, insert 1sc in each st.
Round 2 - 15: You will continue with this step until it reach the height of your tissue. I’d recommend that the round is in an uneven number so that when we make the opening for the front piece it is at the centre.
Ch 1 and turn your work. Insert 1sc in each st.
★ Fasten off.
ii) Front
Round 1: Chain the same number as the back piece. Then, insert 1sc in each st.
This is the pattern that I did for my tissue holder:
Ch 21, insert 1sc in each st
Round 2 - 7: Before moving on to round 2, you will need to do some calculations on how many round you need to do before making the opening for the tissue holder.
The number of rounds = (Total rounds - 1) / 2
Eg: (15 - 1) / 2
= 7
Which means I need to do this pattern until I reach round 7. So, on round 8 I will need to make the opening for the tissue.
Continue with this pattern:
Ch 1 and turn your work. Insert 1sc in each st.
Round 8: You will to calculate how many single crochet that you need on each side so that the opening is at the centre. In this calculations you will also calculate how many chains you need to do for the opening.
The total chains for the opening = (Total chains - 1) 2
Eg: (21- 1) / 2
= 10 chains
The total single crochet for each sides = [(Total chains - 1) - the total chains for the opening] / 2
= [(21 - 1) - 10] / 2
= (20 - 10) / 2
= 5 single crochets in each side
The pattern that I did:
Ch 1, turn your work. 5sc, ch 10 and skip 10 st, 5sc
Round 9 - 15: Ch 1 and turn your work. Insert 1sc in each st
★ Fasten off.
Join the two pieces together by making 1sc all around in each rows and insert 1sc only through the front piece. However for the front piece, you will need to ch 2 and skip 2 st in the centre to create a small hole where you can insert the strap later. Then make an invisible join. Then, attach your yarn in the back piece and insert 1sc in each st but for the centre you need to ch how long you need the strap for the tissue holders to be. This is what you’re going to use to secure the tissue inside the holder.
iii) Flower
Use a 4-ply yarn and 3.0mm hook.
Round 1: In a magic ring, insert 5sc, sl st
Round 2: Attach a new color (before you finish off the last round sl st), ch 1, (1sc, 3hdc, sl st) in the same st x 5
★ Fasten off and make one more.
iv) Butterfly
Use a 5-ply yarn and 3.0mm hook
Round 1: In a magic ring, insert ch 2, 3dc, ch2, sl st, (ch 3, 4tc, ch3, sl st ) x 2, ch 2, 3dc, ch 2, sl st
★ Fasten off. Sew on the body and make the antenna just like how I showed in the video.
Now all you need to do is glue on the pieces onto the tissue holder or you can also sew it on whichever you prefer. Tie two bows and add it to your tissue holder and you’re done!
Star cable organizer
Round 1: In a magic ring, insert 10sc, sl st
Round 2: Ch 1, [1sc, (1hdc, 1dc, 1tc, 1dc, 1hdc) in the same st] x 4, (1hdc, 1dc, 1tc, 1dc, 1hdc), sl st
Round 3: Attach a new color (before you finish off the last round sl st), ch 1. sl st into the same st, [2sc, (1sc, ch 2, 1sc) in the same st, 2sc, sl st] x 5
★ Fasten off and make one more. Then, sew the bottom of two pieces together. Cut a felt fabric and sew the snap button onto the felt. Lastly, glue the felt onto your cable holder.
Flower cable organizer
Round 1: In a magic ring, insert 10sc, sl st
Round 2: Ch 1, insert a sl st into the same stitch, (ch 3, tc3tog, ch 3, sl st) x 5
Round 3: Attach a new color (before you finish off the last round sl st), insert 3sc in the ch 3, Inc, insert 3sc in the ch 3, sl st) x 5
★ Fasten off and make one more. Then, sew the bottom of two pieces together. Cut a felt fabric and sew the snap button onto the felt. Lastly, glue the felt onto your cable holder.
Stripe cable organizer
Round 1: Ch 5, insert 1sc in each st <4>
Round 2: Ch 1 and turn your work. Insert 1sc in each st <4>
Round 3: Attach a new color (before you finish off the last round sc), Ch 1 and turn your work, insert 1sc in each st <4>
Round 4 - 14: Ch 1, insert 1sc in each st <4>
Round 15: Attach a new color (before you finish off the last round sc), Ch 1 and turn your work, insert 1sc in each st <4>
Round 16 - 18: Ch 1, insert 1sc in each st <4>
Round 19: Ch 1, turn your work. Insert 1sc in alll around
★ Fasten off. Cut a felt fabric and sew the snap button onto the felt. Lastly, glue the felt onto your cable holders.
You’re done!!
From creator
Hi! Haly here, well done finishing the pattern. I'm so proud of you 🩷 Thank you for visiting my site and give my pattern a lot of love. I won't be here if it's not for you!! If you create the pattern and post it on any social media please tag me @muciestudio I would love to see all your creations and you don't know happy I am seeing each one of your posts 🥹🫶🏻 Feel free to reach out if you have any questions, I would be happy to help!
Latest crochet pattern!


You saw. You came. You crocheted.
Thank you for visiting!
